
Recently we acquired Epson V850 Pro scanner and silver fast license,
We scan the IT8 target in silver fast software and create a profile in i1Profiler software . When we use this profile for scanning the LAB values does not match with the actual LAB values on sample.
What is the ∆E2000 difference?
Thanks for your response,
Delta E2000 difference are in range of 3 to 10+
One more thing the IT8 reflective target we received with scanner. The actual lab values of that target (measure through a exact spectrometer device) and the values in Monac reference file for this target are not same.
We measure the target with no color correction in Silver fast and created a profile through i1 profiler software and use this profile as an input profile in Silver fast and scan image. But when we open image with no color management in Photoshop lab Values does not match with the actual one
I do not know what your use is and therefore how important these ∆Es are.
I would consider ∆E of 3 to be effectively the same colour and even ∆E ~10 in a single instance viewing to be the same colour. By that I mean not putting them along side.
My experiments showed me that PS is not a scientific tool it is an Art tool. Using CTP I was able to show PS didn’t always do things scientifically correctly.
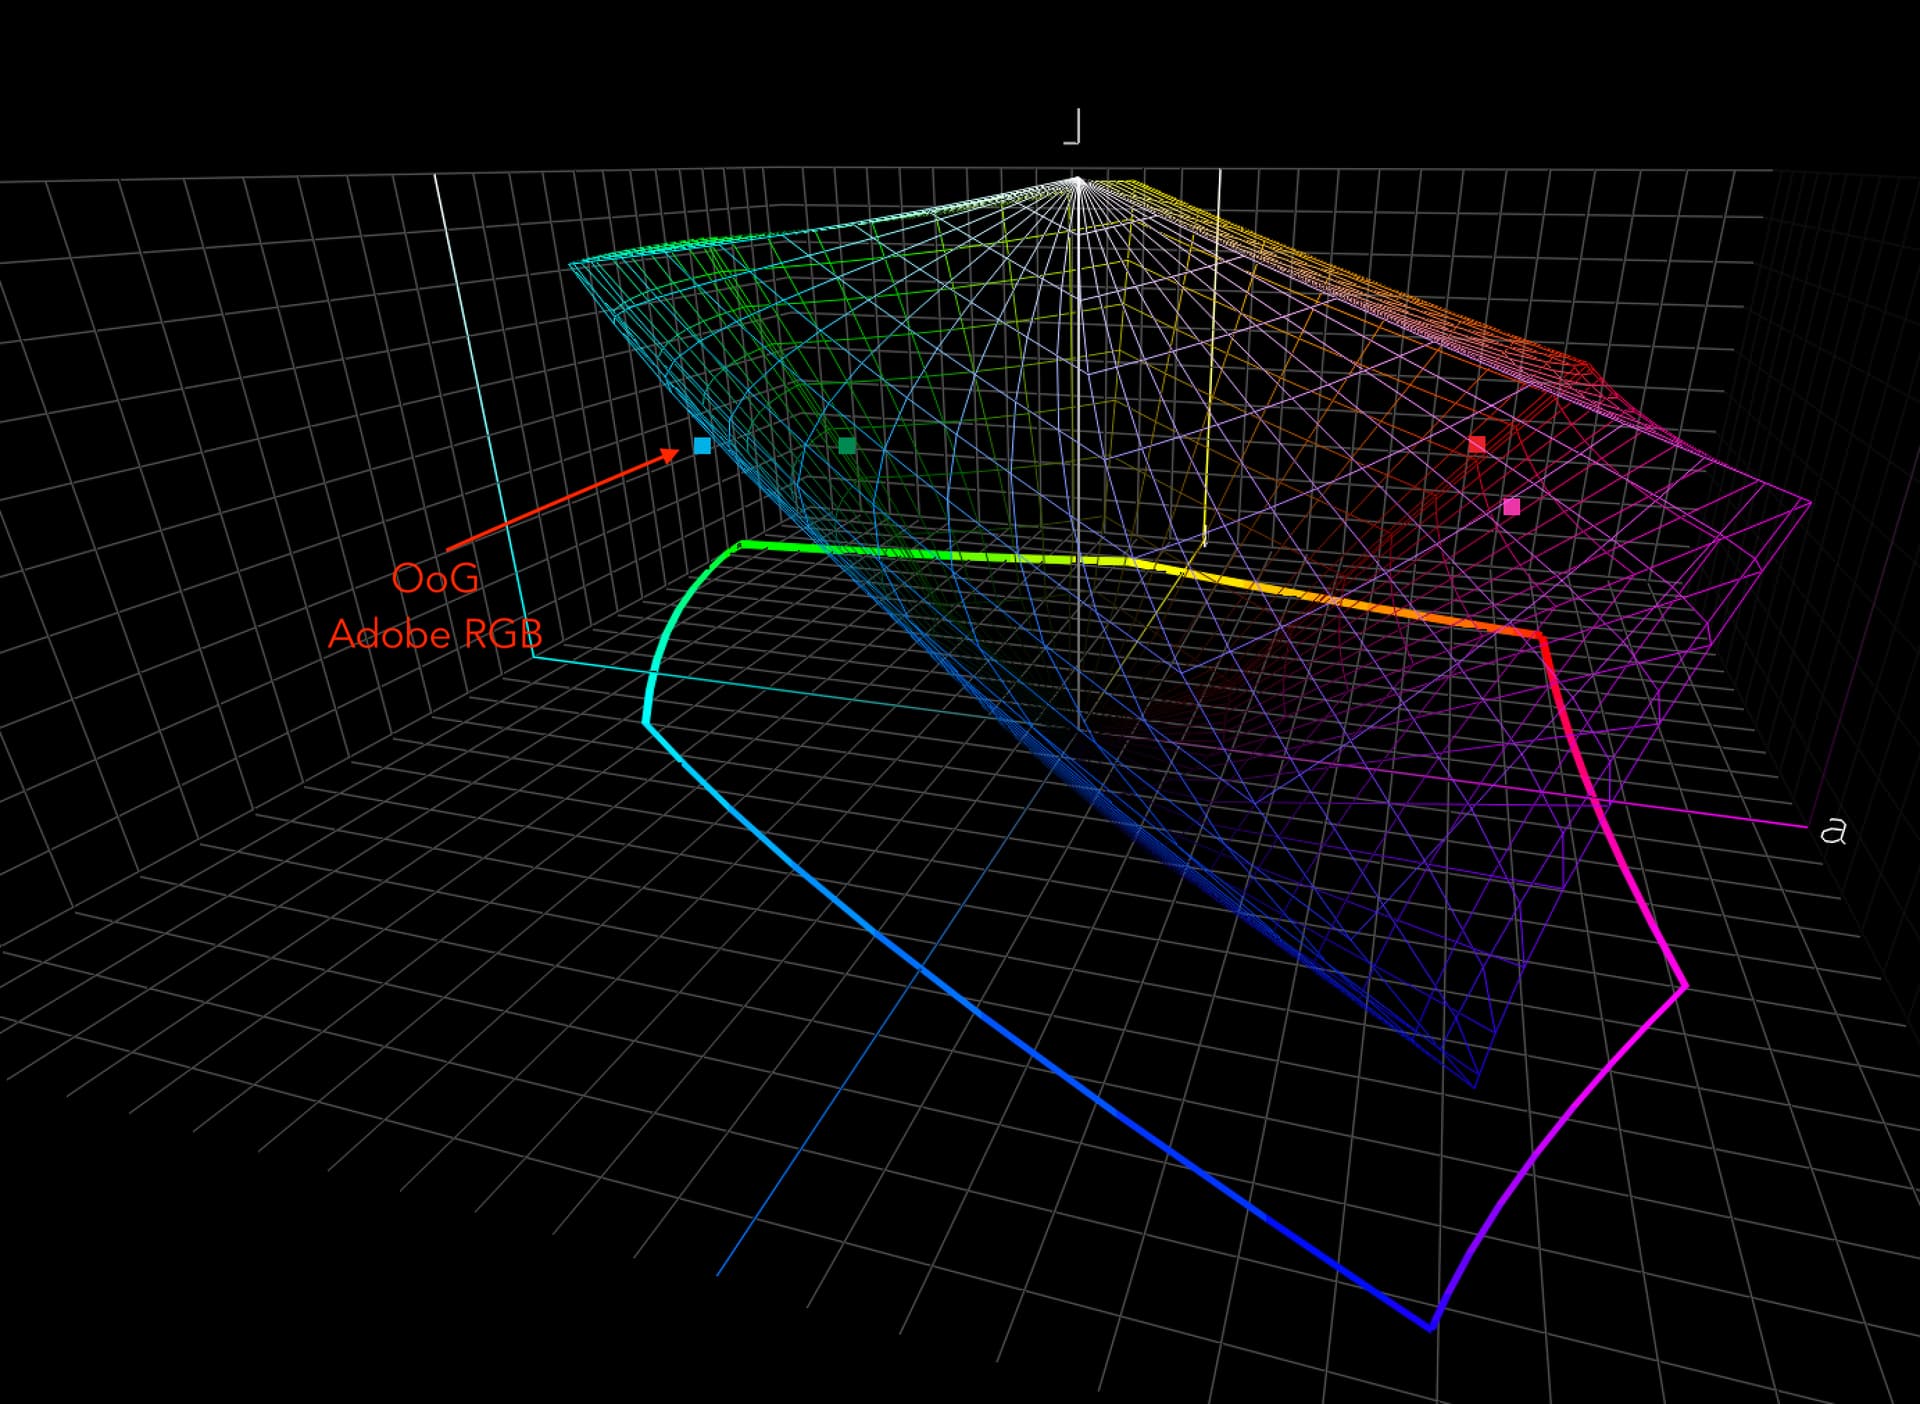
Depending on what you are doing and putting a bit of faith in PS I would print out the Lab colour you expect from your target and the Lab colour you measure with your spectrometer in such a way as you can easily compare the two across the colours in your target. Obviously checking Gamut Warning. I’d actually do that in CTP as well as one of my experiments showed that colours that were OoG in CTP did not show up as OoG in PS. IE in my physicist head if a colour in CTP is 0.5 ∆E OoG then it is OoG but I think PS requires it to be a lot OoG before it warns as you’d never perceive a 0.5 ∆E OoG.
I would also check what all the error bars are for the supplied target, the scanner, the spectrometer etc. Are you just hitting the fundamental accuracy of your target and equipment?
It seems to me you might have the basis for an interesting talk or paper. ![]()
it’s a two days holiday in our town, on next working day (Tuesday)I will send you the complete details with readings and screenshot. which will help you to understand the whole scenario & hope your guidance in this matter.
Let me explain the in detail, which will help you to understand the whole scnerio.
-
We created a library from our press colors. (Process and OGV Colors)
-
Convert that color library into Cfx format.
-
Convert the cfx file format into ASE (Adobe swatches exchange) format through Patch tool software. (patch tool shows the same LAB values during and after conversion of cfx file into ASE format)
-
When Open this ASE format library in photoshop, it shows the same LAB values of colors with out of gamut sign, but when we implement those color the LAB values and tonality of those colors change. (we used different working space to resolve this problem Adobe RGB, Adobe1998, sRGB, Apple RGB)
(The following video will help you to understand how LAB values changes when we implement colors on photoshop)
For us 2 Delta E 2000 is a maximum range.
And last thing, the colors that photoshops shows out of gamut actually get from our press (Rotogravure & Flexography). which gamut always small from the digital gamut like sRGB, Adobe RGB, Apple RGB.
Then why it shows those colors out of gamut.
Please guide.
![]()
Hi
The first thing I suggest is that you contact SilverFast support and describe just this part of your problem to them. I have found SilverFast to be very good with their support. My guess is that if you do not supply all the setup information at the start then they will ask you that question.
They will help you get to the reason why your scanned results do not match the target or explain why you get a difference.
They may also be able to help with this question
One more thing the IT8 reflective target we received with scanner. The actual lab values of that target (measure through a exact spectrometer device) and the values in Monac reference file for this target are not same.
None of the colourspaces are big that you mention. If you have a Lab colour and it is out of gamut according to PS it will be altered to put it into your Photoshop working space. The amount and manner it is altered will be a function of your Rendering Intent. If you change your PS working space to be ProPhoto (16 bit) none of your real Lab colours should flag up as OoG and should transfer almost exactly.
As soon as a colour is flagged by PS as OoG its Lab values will not transfer into PS.
You can check what Photoshop is saying about OoG by using CTP.
1 Like
We checked the Colors in Color Think and find out, that the colors that adobe display out of gamut from the Adobe RGB working space were actually out of gamut. (mostly Cyan is out of gamut)
As you said:-
If you change your PS working space to be ProPhoto (16 bit) none of your real Lab colours should flag up as OoG and should transfer almost exactly.
So, we changed our working space from Adobe RGB to Pro Photo so that colors fall in the gamut. But even using Pro Photo it still shows the color out of gamut.
Is there any specific color setting in Adobe for Pro Photo working space or there is any other mistake we doing?
Continuing the discussion from Scanner profile give wrong result:
Hi
Something else is very wrong.
I do not believe any Lab values for a normal reflective surface will fall outside ProPhoto.
However Lab contains theoretical colours which are outside ProPhoto (and there are theoretical colours inside ProPhoto outside the normal range of Lab!)
Put those OoG Lab values into CTP with ProPhoto. Check they are definitely OoG.
If they are not then you have not set up your PhotoShop OoG test correctly.
See below
If the above isn’t the problem I am suspicious that there is an error in the Lab values of the colours that you are saying are outside ProPhoto.
If you wish you can provide me with the original Lab values that your current experiment say are outside (OoG) ProPhoto and I will check them for you.
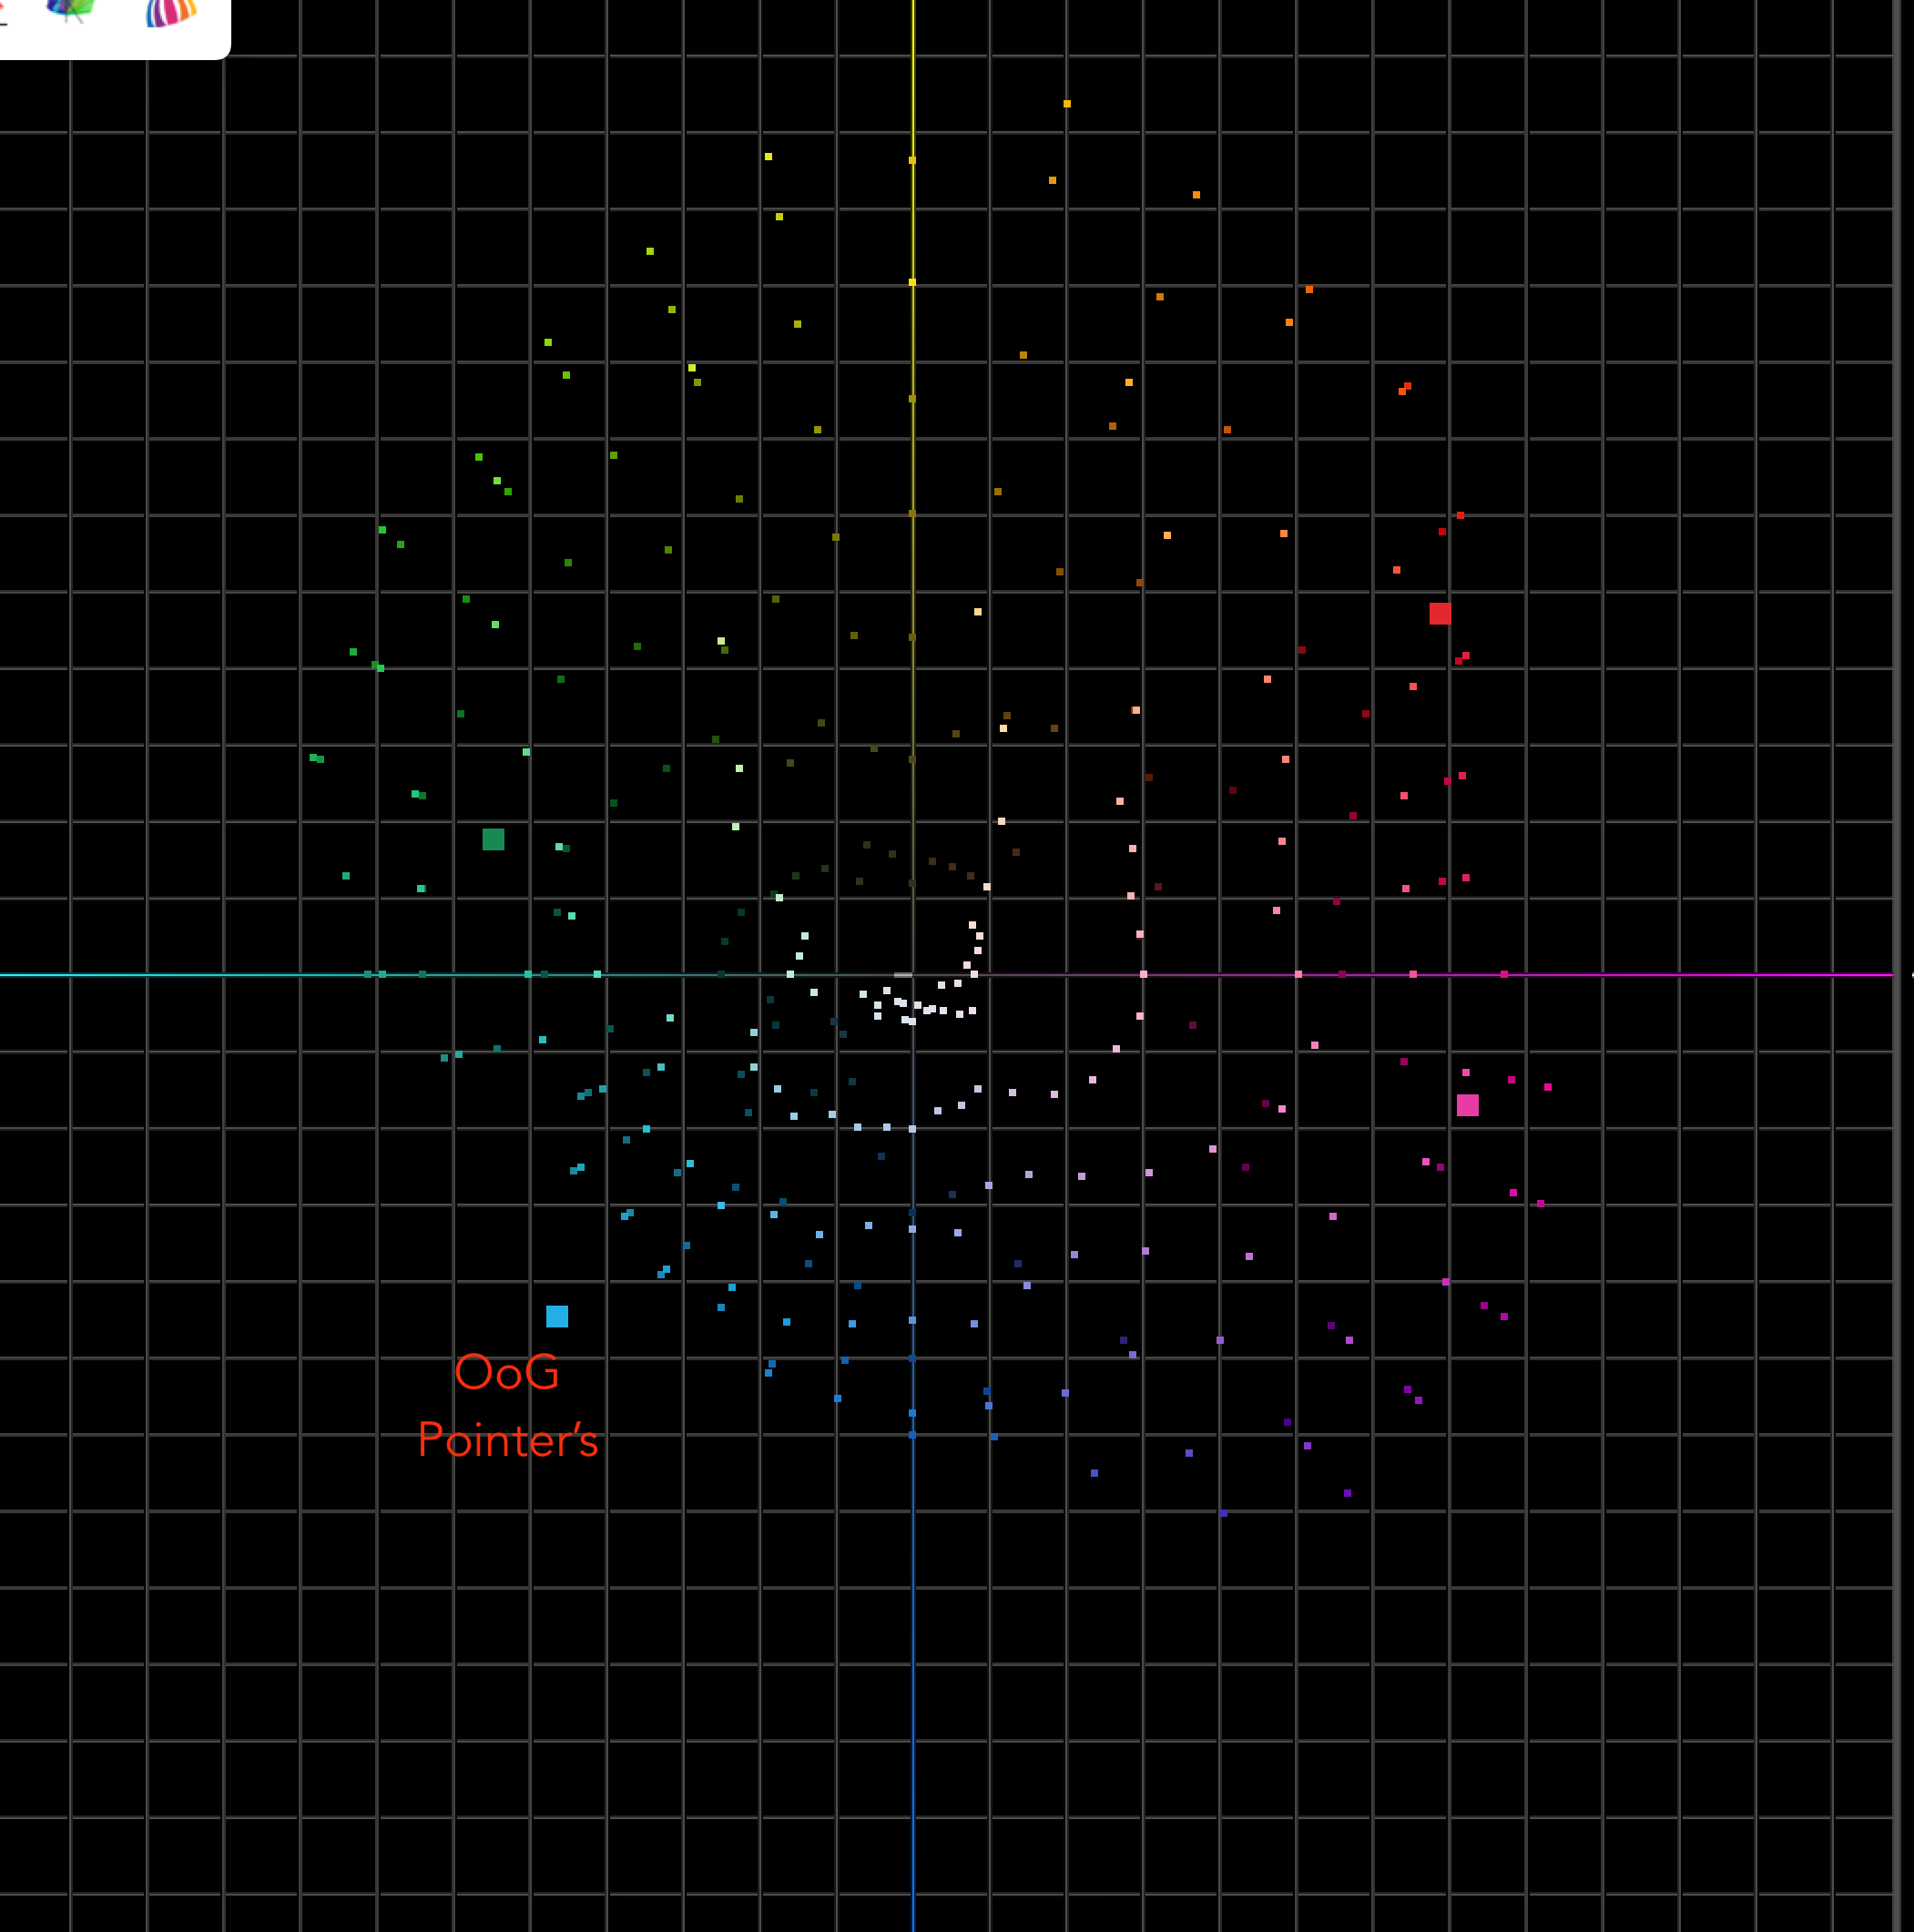
FYI There is a Gamut called Pointer’s Gamut. You could put that into CTP with your original Lab values. It is unlikely the readings are correct/real if they lay outside this Gamut.
Custom Set up for Proofing Colours
Hi
As you said:-
Something else is very wrong.
I do not believe any Lab values for a normal reflective surface will fall outside Pro Photo.
The spectral data (LAB Values) are taken from our press inks. (Solvent Based inks). The Values are in Pro photo gamut when we checked them in Color Think Pro.
Cyan Out of Gamut in Adobe RGB1998
Cyan & other Colors in gamut in Pro photo.
But are OoG when we checked in photoshop.(Especially cyan).
If the above isn’t the problem, I am suspicious that there is an error in the Lab values of the colors that you are saying are outside Pro Photo.
If you wish you can provide me with the original Lab values that your current experiment say are outside (OoG) Pro Photo and I will check them for you.
For your analysis, please find the attached Spectral data in Text, cfx and ASE format.
Muzamil 07-Feb-2024
Color detail
L*
a*
b*
Ariel Cyan
62.99
-46.35
-44.34
Ariel Magenta
55.51
72.15
-17.04
Ariel Green
48.73
-54.73
17.56
Ariel Red
50.71
68.67
46.99
FYI There is a Gamut called Pointer’s Gamut. You could put that into CTP with your original Lab values. It is unlikely the readings are correct/real if they lay outside this Gamut.
From where we can get or download the pointer’s gamut?
![]()
Muzamil 07-Feb-2024.cxf (16.7 KB)
Muzamil 07-Feb-2024_spectrum.ase (210 Bytes)
This is an interesting discussion. I like group problem solving
One thing worth remembering is that Photoshop determines what’s “out of gamut” by the expected ΔE color shift when converting through a profile. It’s not, as many believe (and the function implies), that a color is actually determined to be outside the gamut surface.
This was discussed on the ColorSync users list (many) years ago. I think the consensus was that it was probably the best method for Photoshop and its users, even though profile errors could incorrectly indicate a color is out of gamut.
That said, I don’t expect workingspace profiles will cause incorrect OOG indications, I just though it was worth remembering…
Steve
1 Like
Thanks Steve
I have a distrust of PS OoG.
Being a Physicist to me an OoG with ∆E of 0.01 is technically OoG but using CTP I decided if ∆E was “small” PS decide it was in gamut on the basis that no human artist would see the difference.
I described it to you as CTP is a scientific tool and PS is an artistic tool and as such their approach is different.
However Muzamil seems to have the reverse problem.
The Pointer's Gamut - The Coverage of Real Surface Colors by RGB Color Spaces and Wide Gamut Displays - TFTCentral is where Pointer’s Gamut is discussed.
I’ve just done a quick search for it on my HD and only come up with a link to an excel spreadsheet which is now dead. I even discuss the spreadsheet with my colour mentor. ![]()
I’m sure it is somewhere on my HD but I need to search harder and I’ve more pressing things to do at the moment.
I don’t think Pointer’s Gamut will help you solve your problem.
I will look at the Lab values after my busy period.
Rex
1 Like
Ps This has been on my HD since March 2015. I cannot guarantee it!
My curiosity overcame my desire for a Rest
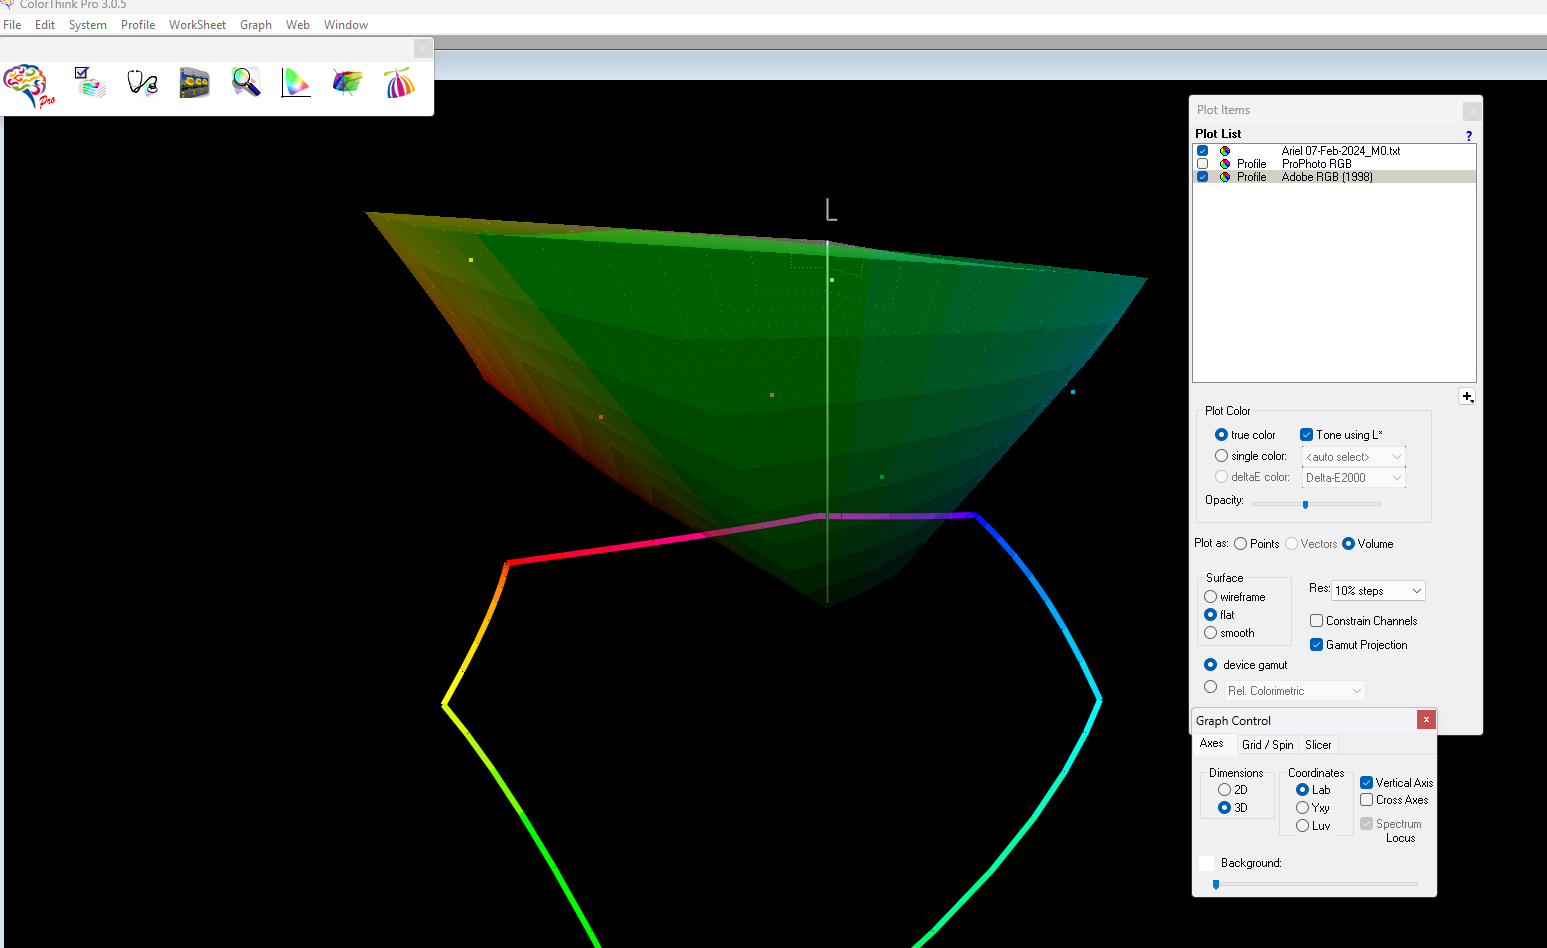
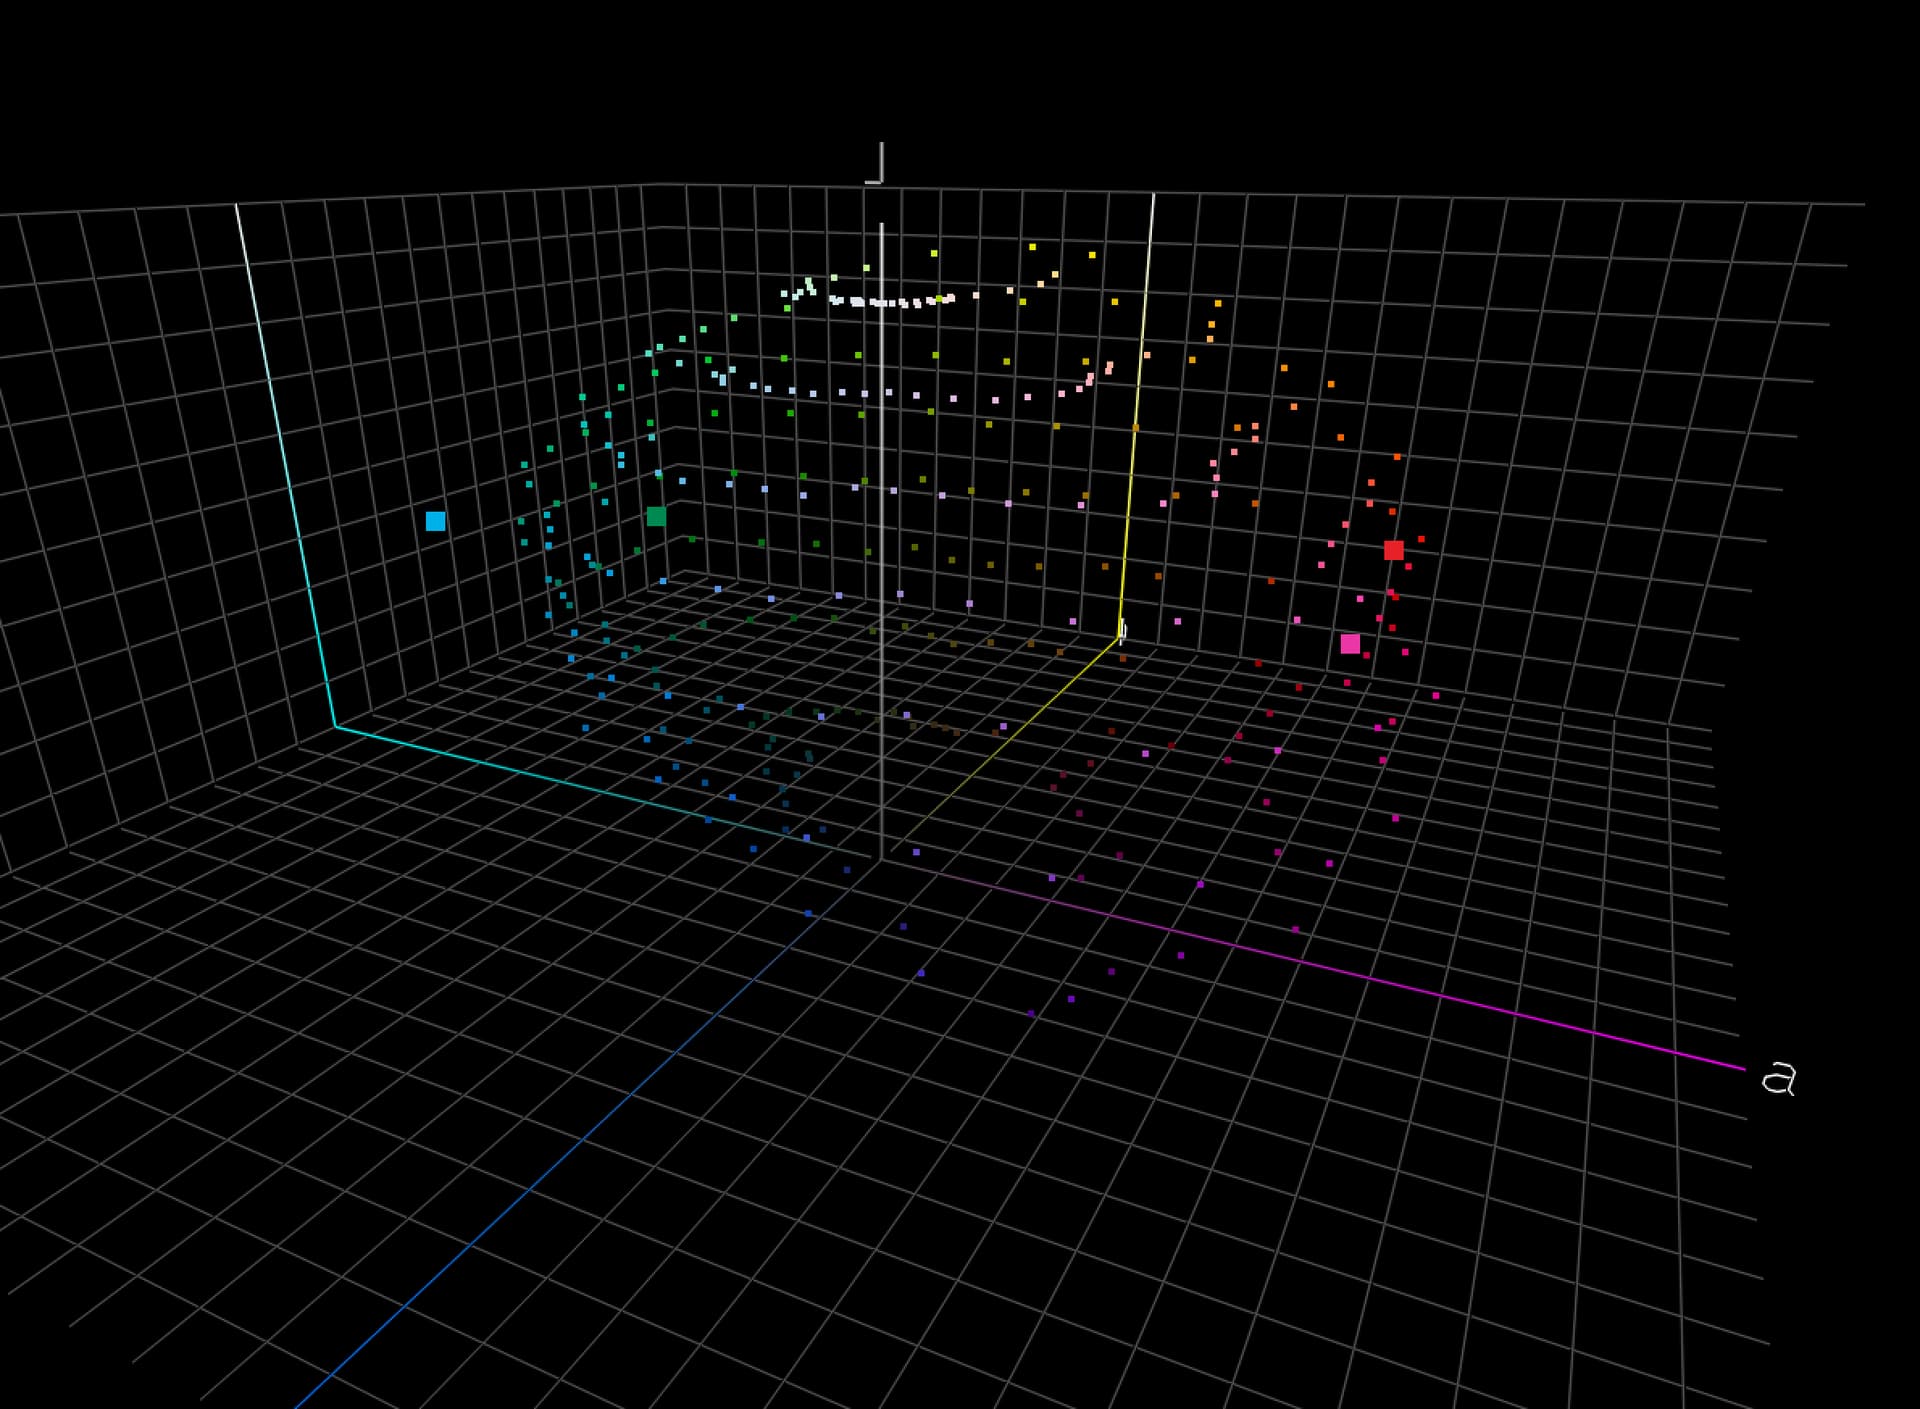
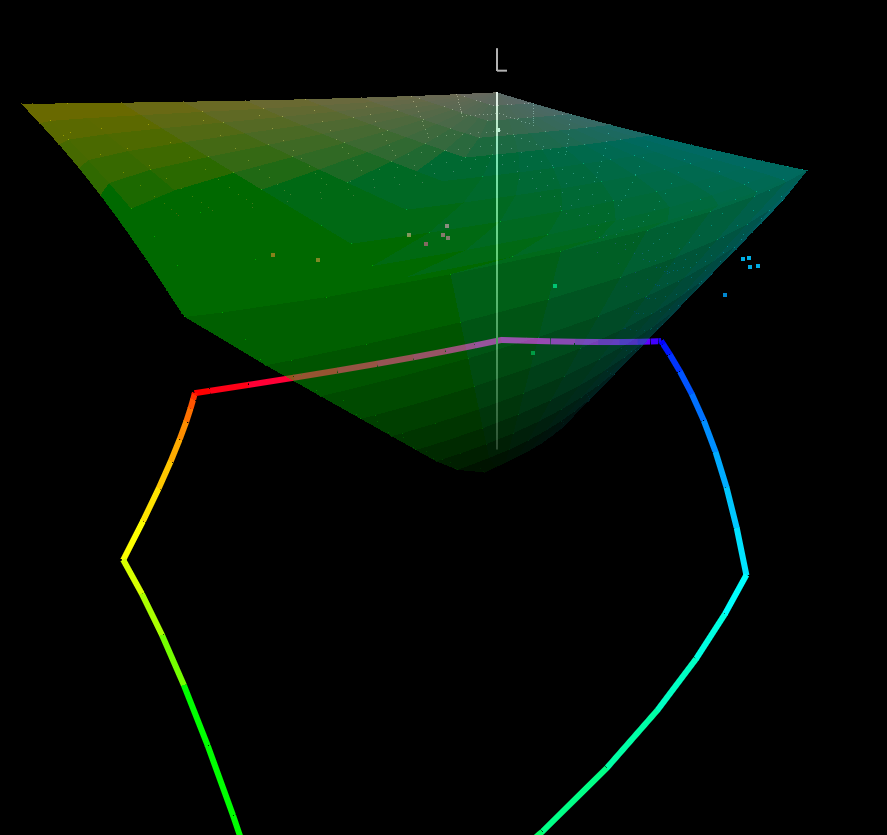
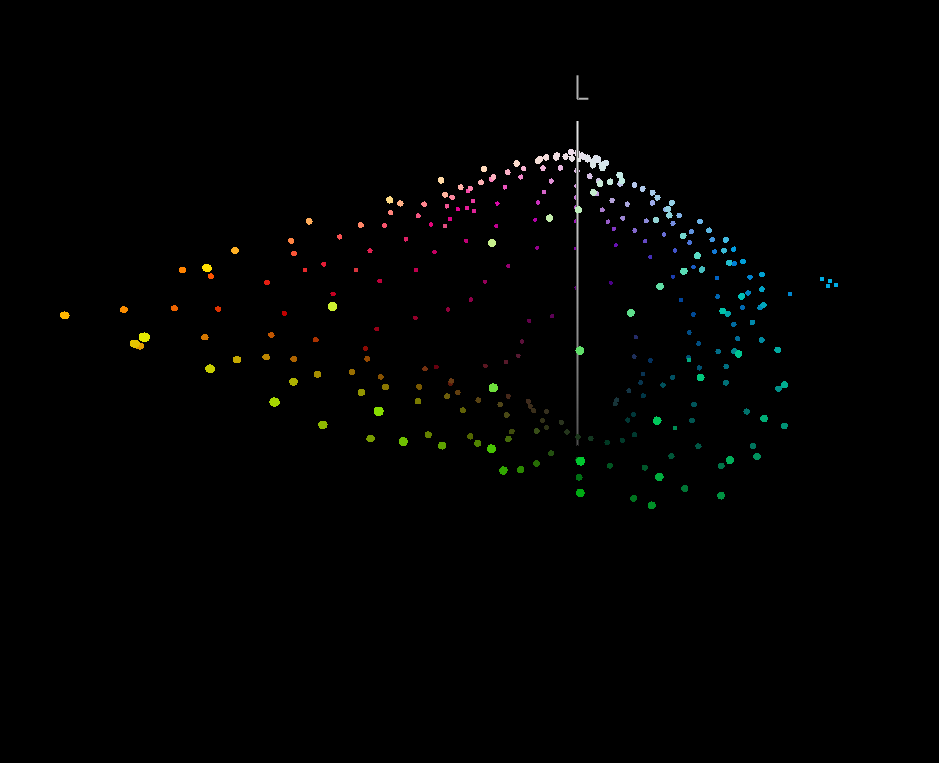
Nothing is OoG in ProPhoto

and
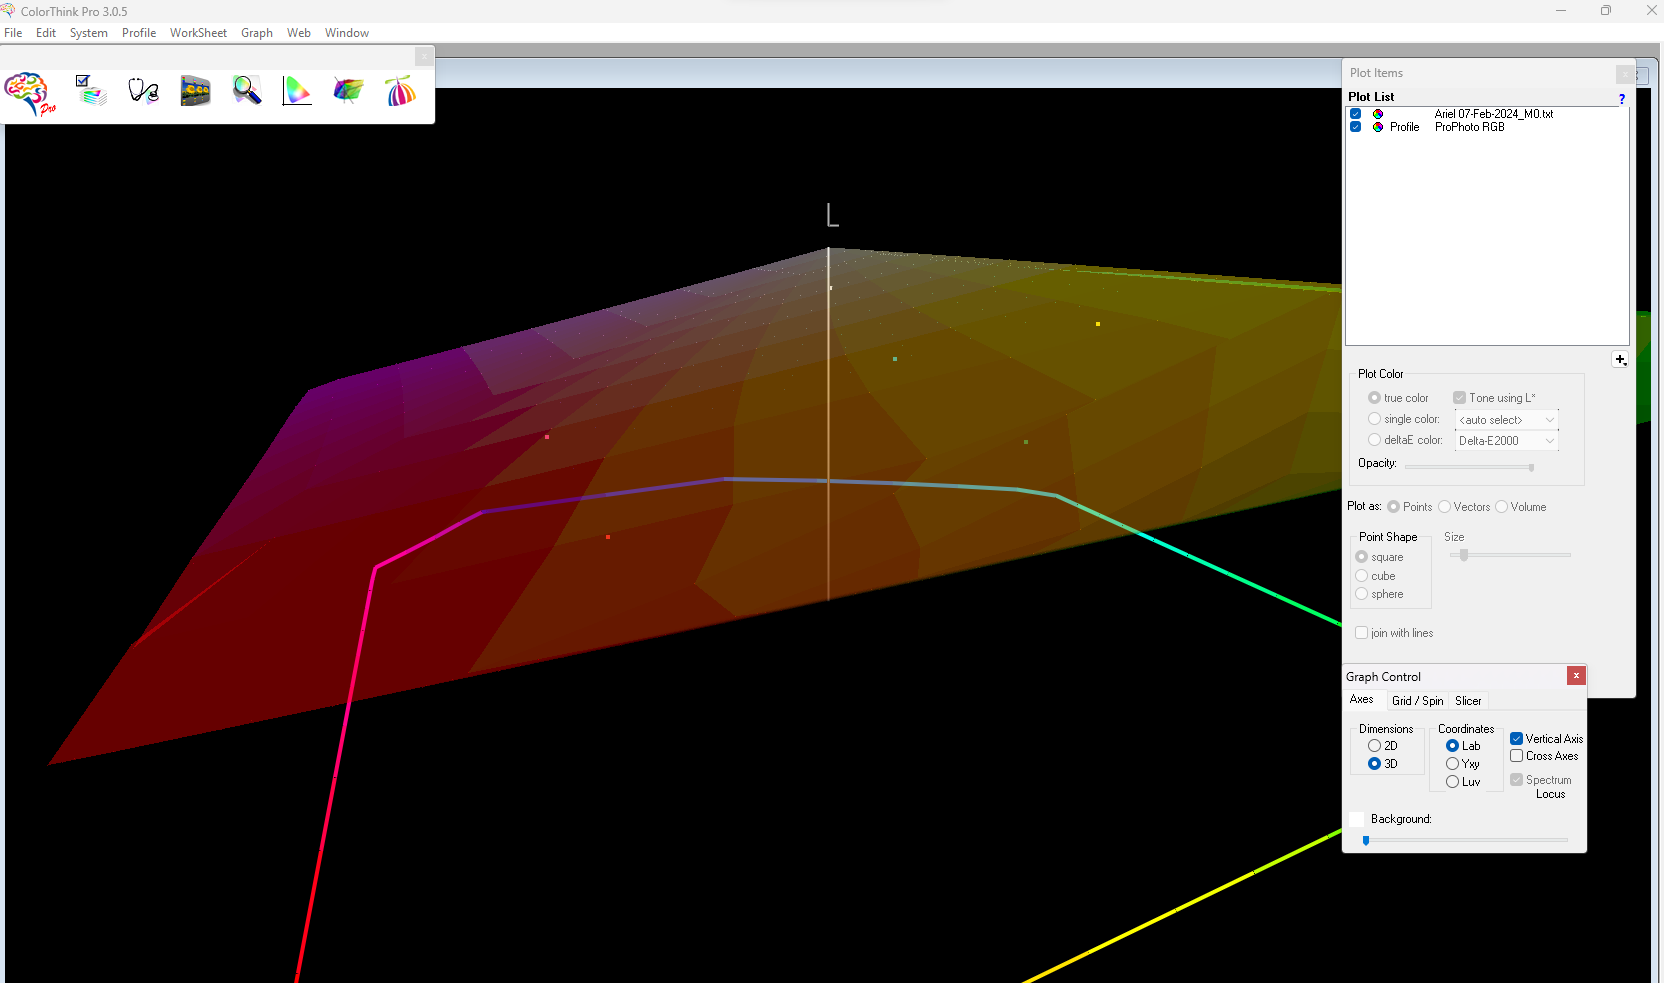
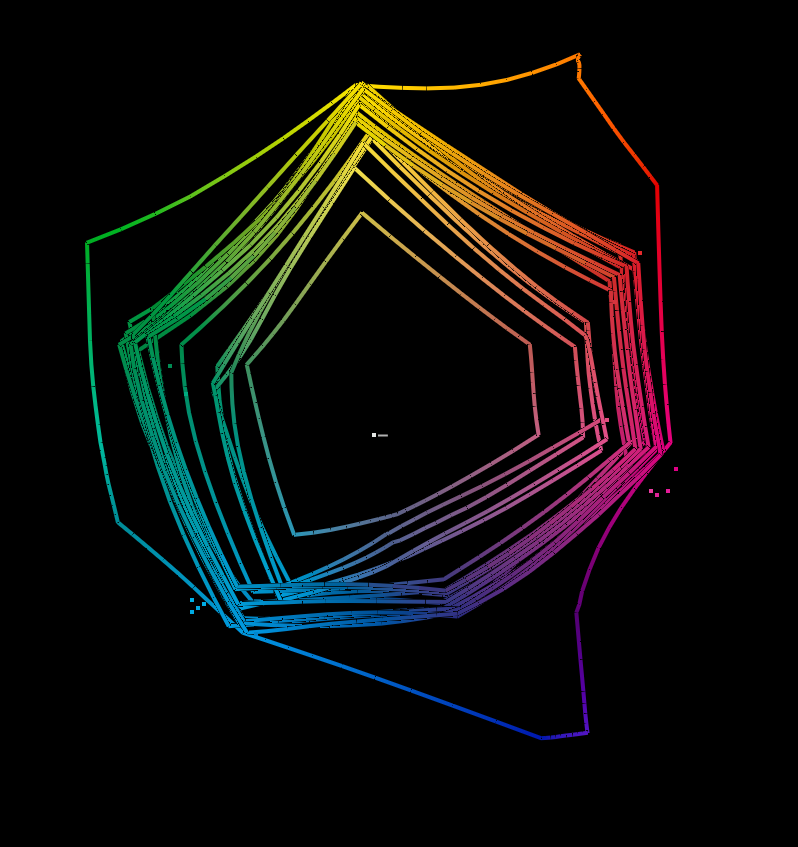
Only one point is just OoG in Adobe RGB
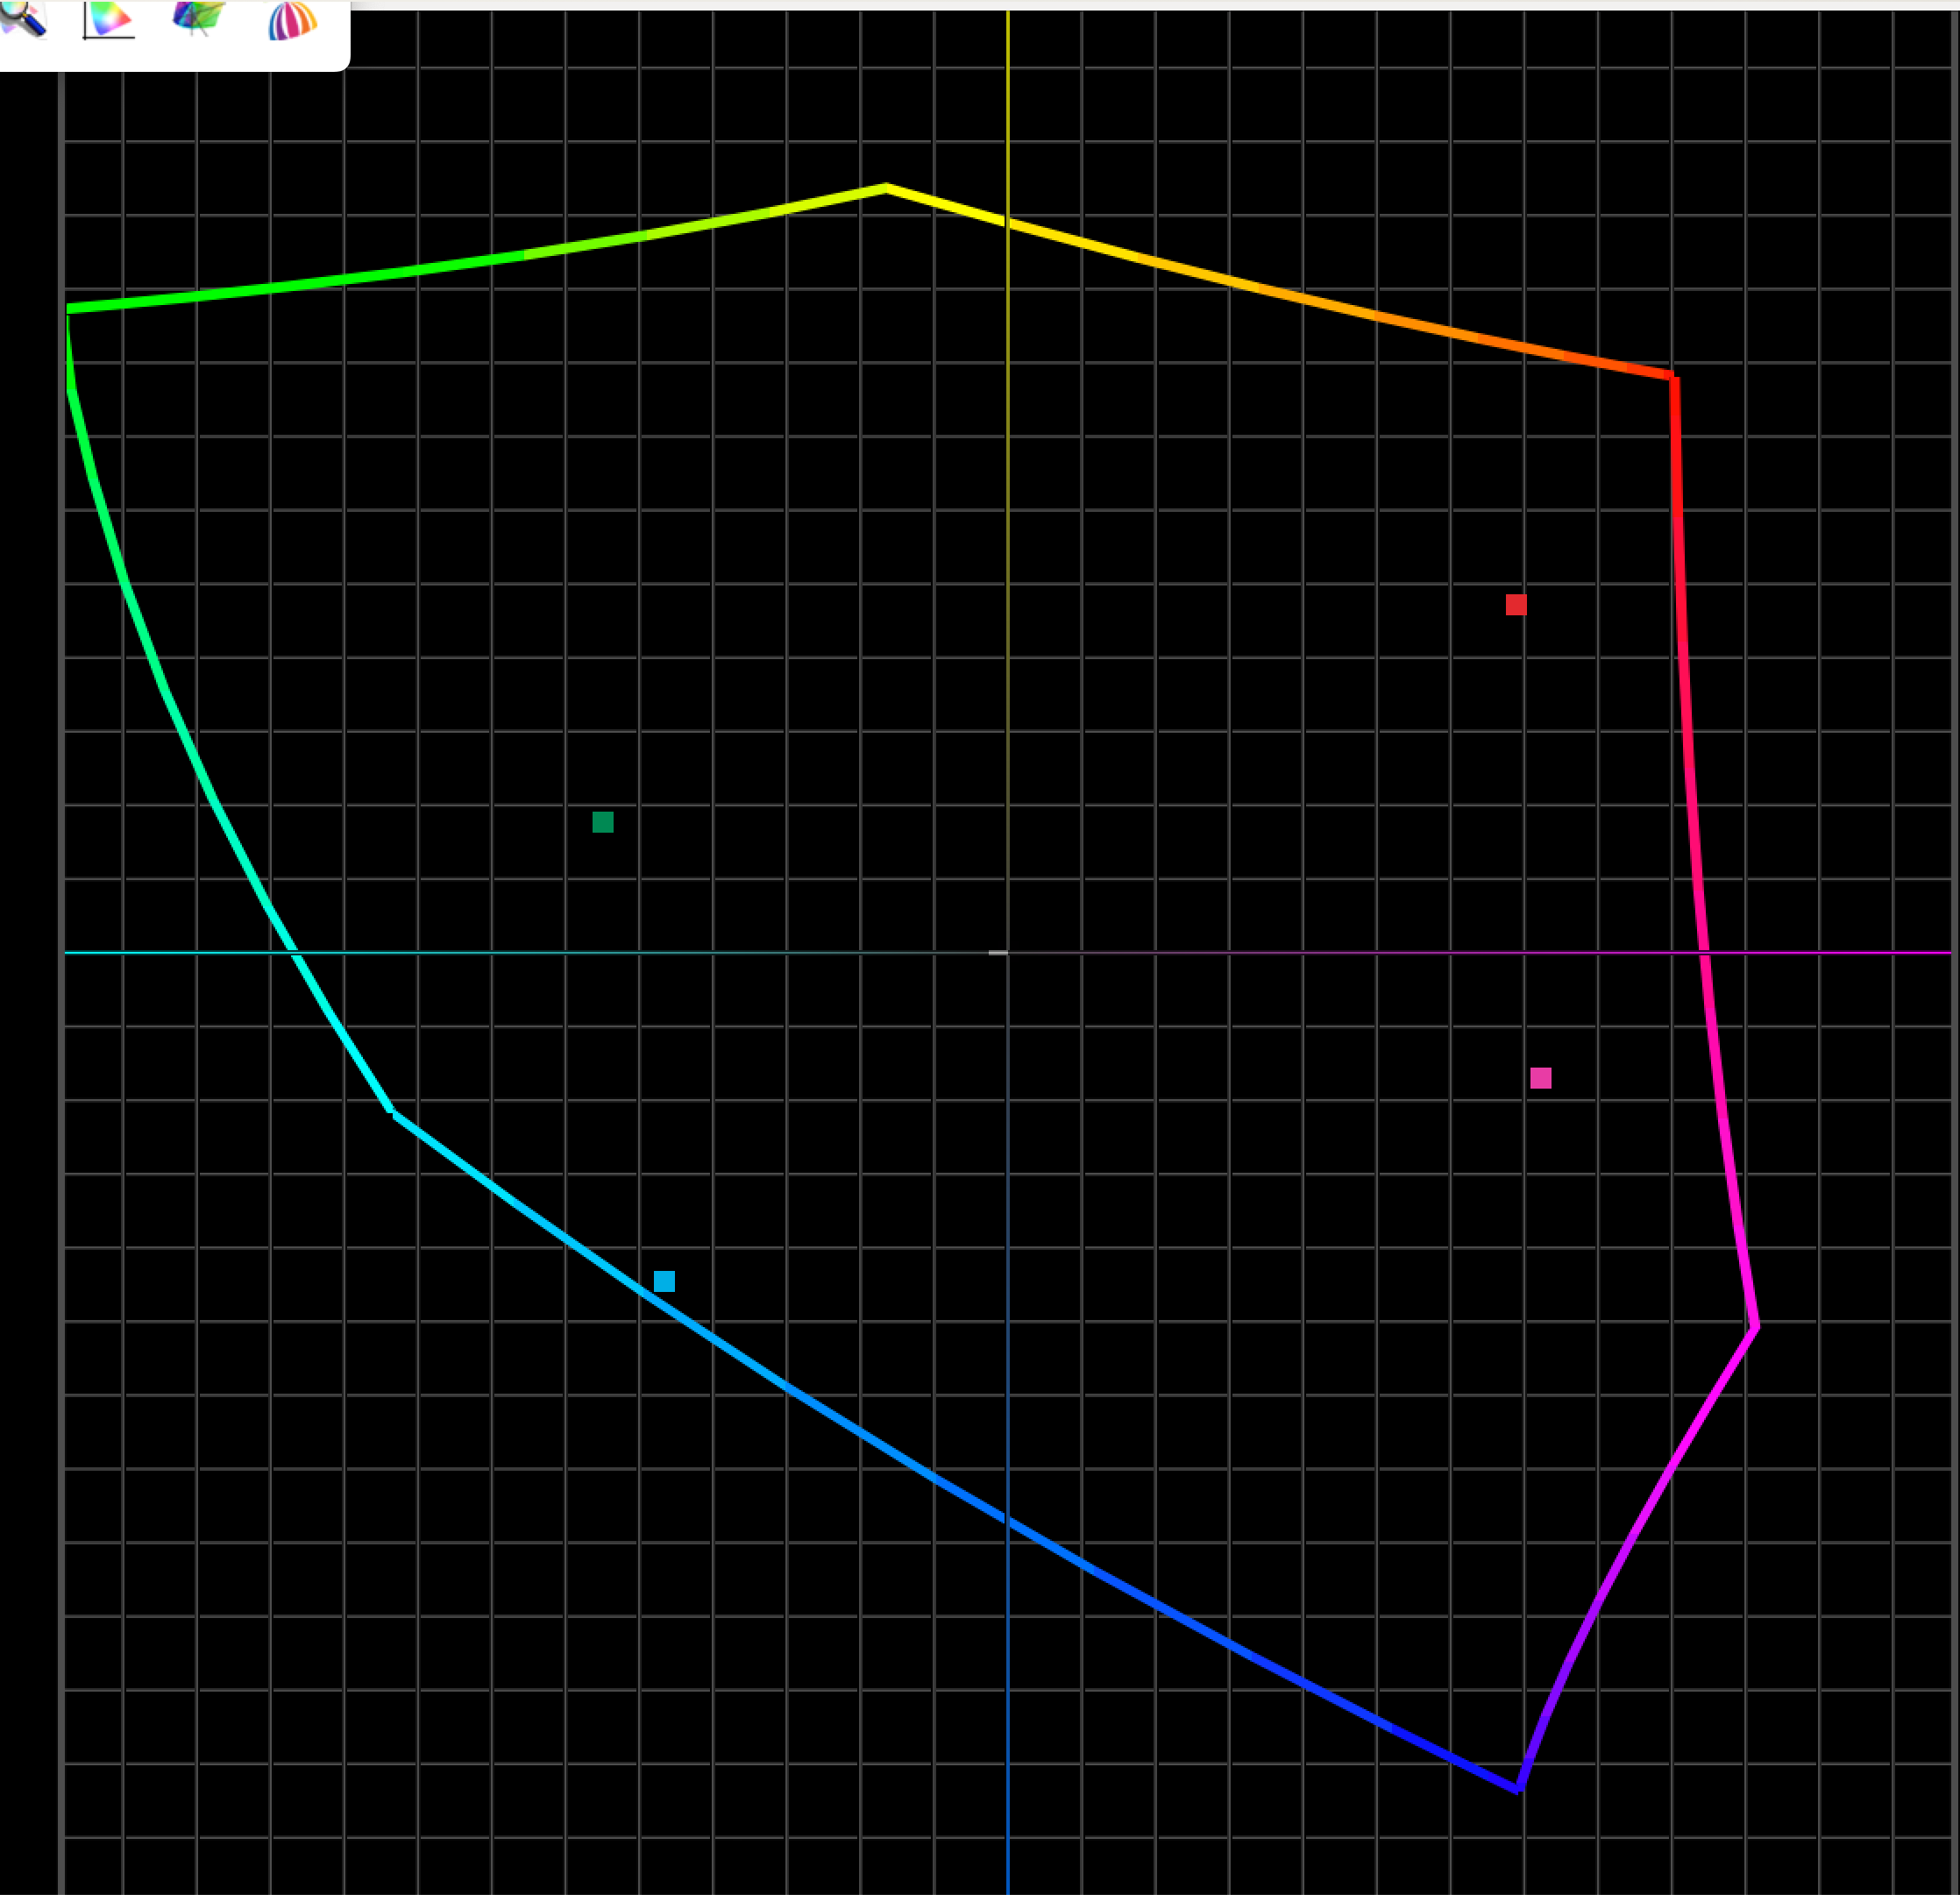
Which is the same point outside Pointer’s Gamut
I hope this helps.
It seems you are doing something wrong in your OoG checks in PS.
I did show how to set up soft proofing.
The Cyan is so close to Adobe Gamut edge I would expect a minimal change when you put it into Adobe RGB working space.
Regards
Rex
It’s not about only for one Cyan Color. it showing all cyan colors OoG taken from different samples.
I have taken spectral data from different sample & following are the results.
All colors are in Gamut except Cyan.
Adobe RGB1998
Pioner Gamut
As you said:-
The Cyan is so close to Adobe Gamut edge I would expect a minimal change when you put it into Adobe RGB working space.
The difference between the Actual value and the recommended values of PS for in Gamut Color are 6,7 Delta E. Which is very high.
So its seems so close to adobe Gamut but actually is not.
This table will help you to understand the difference. (For ariel Cyan)
Details
L
a
b
Delta E2000
Actual Value
65
-47
-41
6.83
PS Value of close match
59
-36
-38
As you said:-
My curiosity overcame my desire for a rest.
Nothing is OoG in Pro Photo.
Yes, you are right, all colors are in pro photo gamut as shown by the color Think Pro.
But Pro Photo in PS showing those colors OoG, which is Completely beyond understanding.
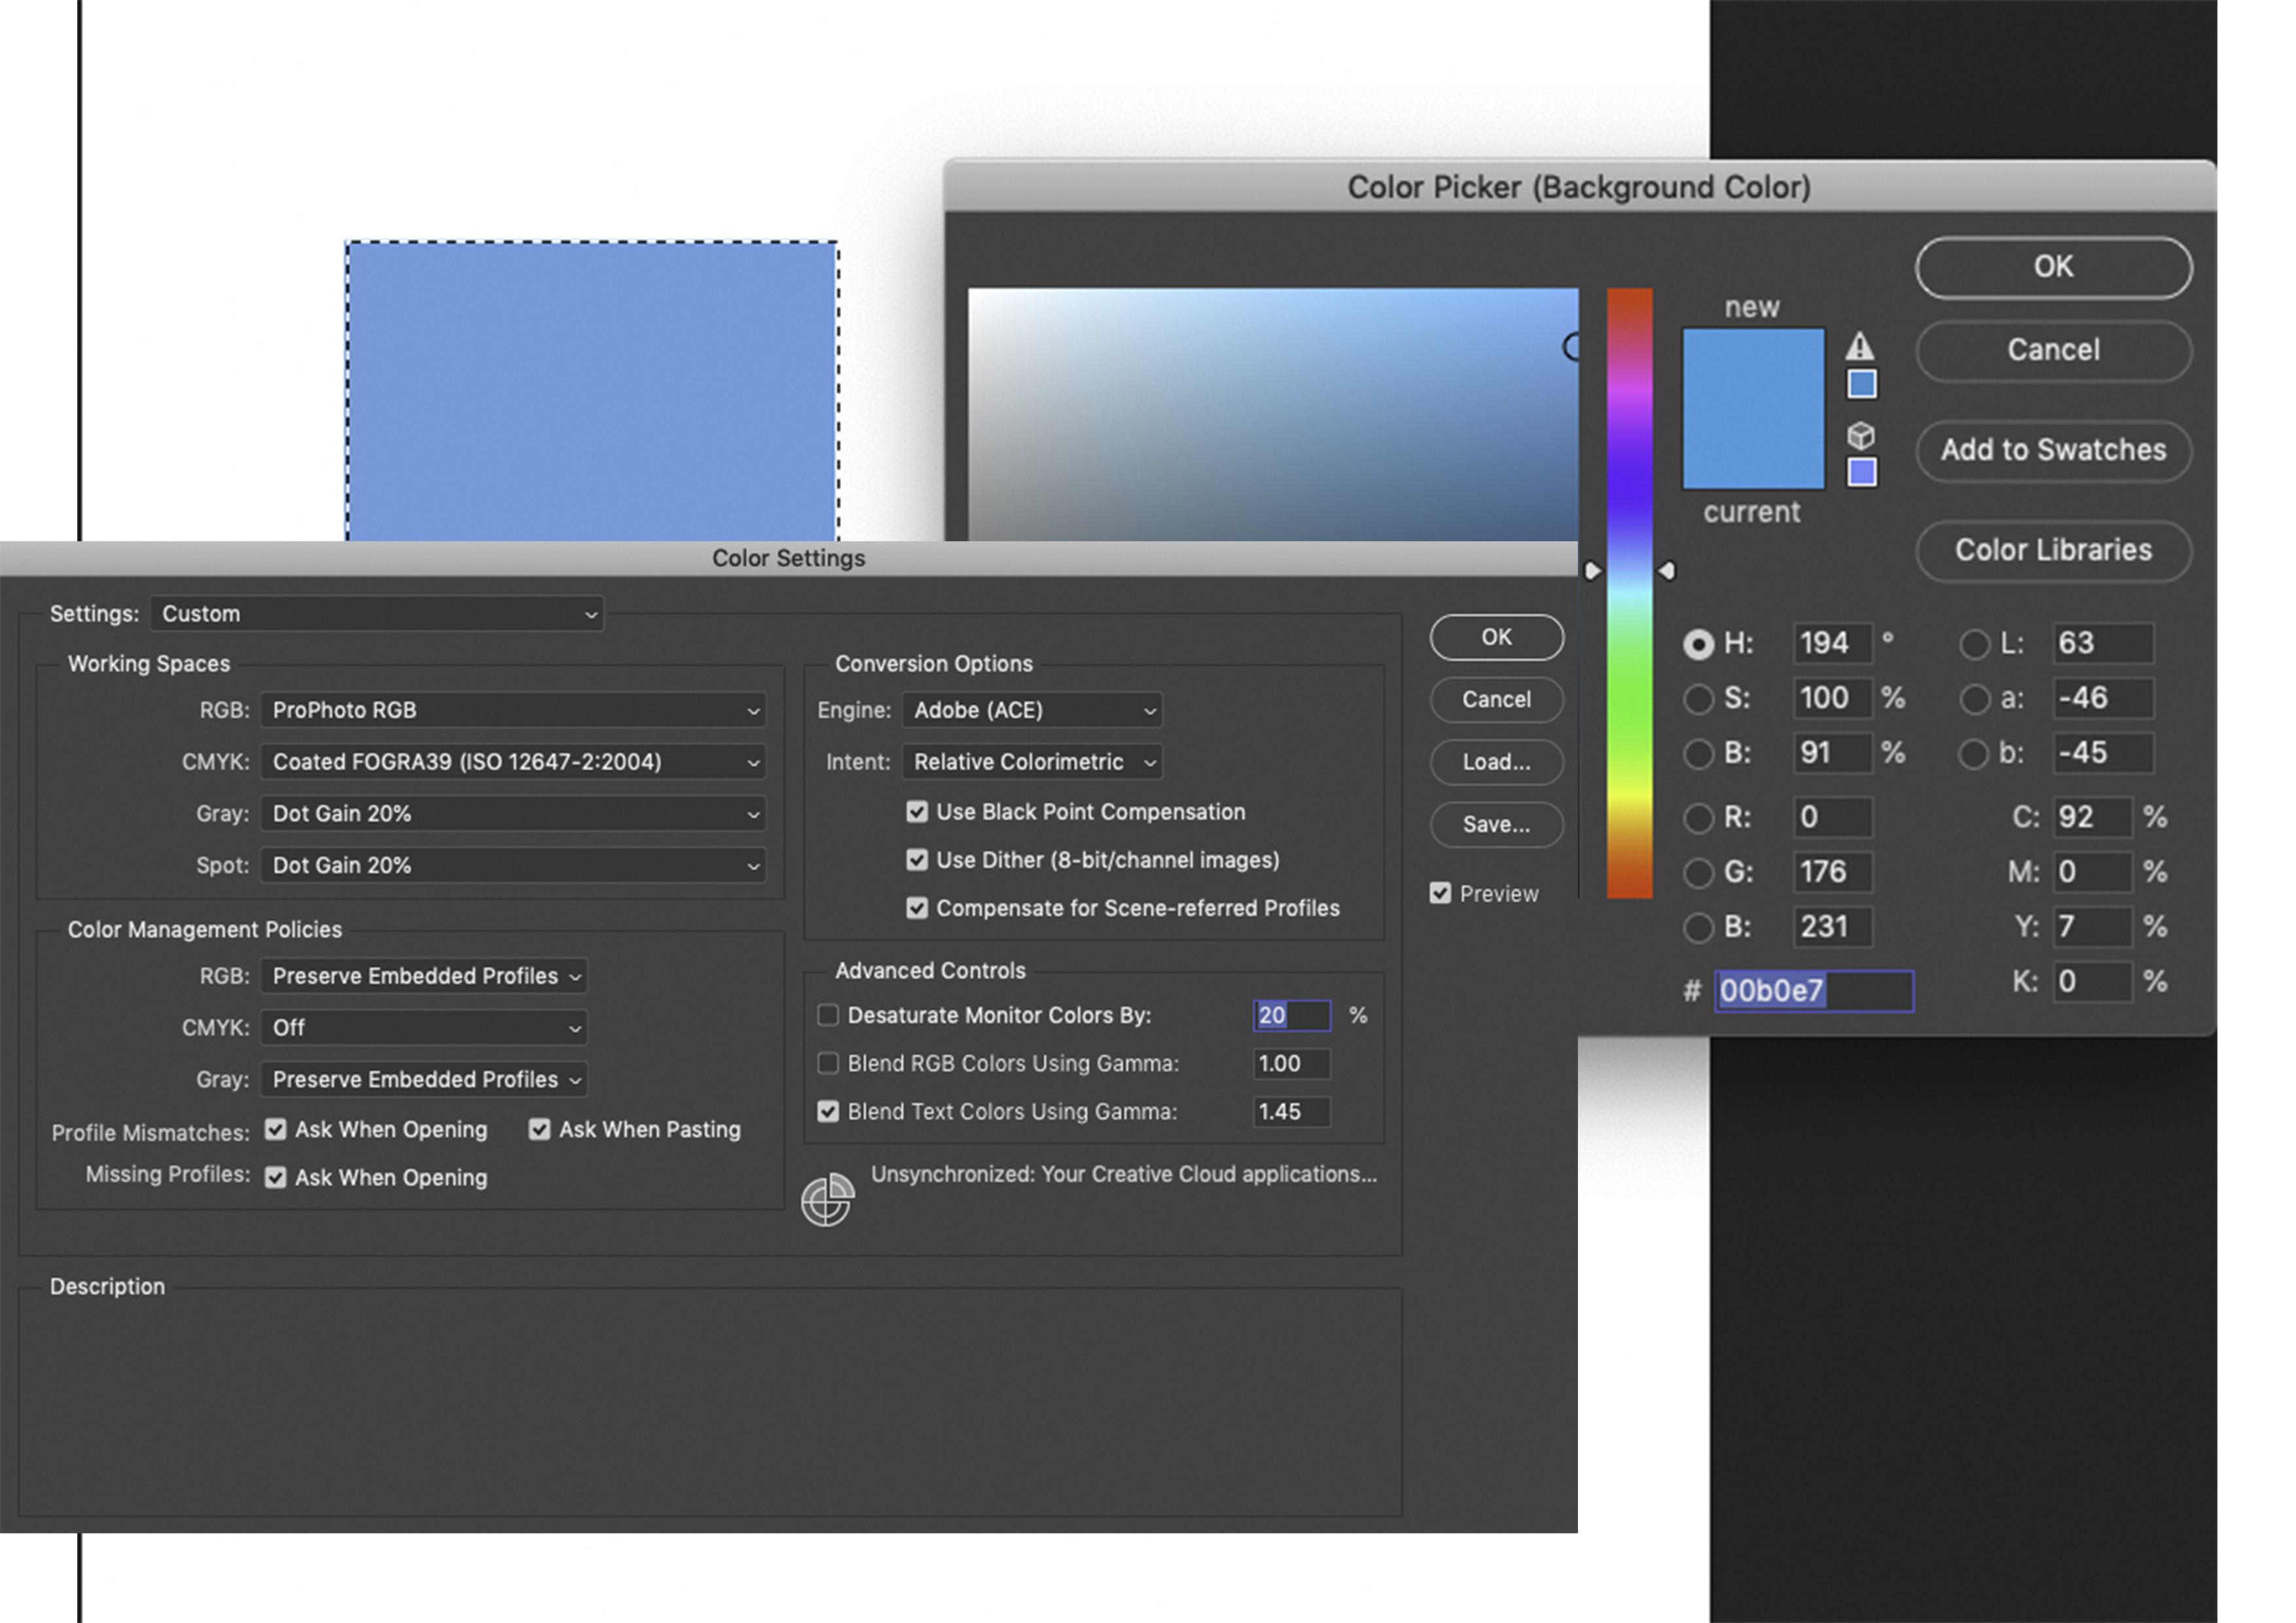
Following are the setting and screen shot of OoG color.
It seems you are doing something wrong in your OoG checks in PS.
Please guide us the Correct checks and setting for Prophoto Working space. So that all colors would be come in gamut.
we also attached the the Text, Cfx and ASE file formats of these colors which details are given in above discussion.
We also check the gamut of many CMYK working space profiles on CTP. (Web Coated Fogra 28, US Web Coated SWOP V2, US Sheetfed, Uncoated Fogra 39, Japan Web Coated, ISO Web Coated, PSO Coated V3, Web Safe Color, PSO MFC Paper, Japan Color 2001 Coated and many more.)
Following are the results.
10-Feb-2024.cxf (46.9 KB)
10-Feb-2024_M0.txt (7.8 KB)
10-Feb-2024_spectrum.ase (734 Bytes)
Sorry for the delay in answering.
Your replies have been coming through on email which alerts me to looking at the forum. However this reply did not.
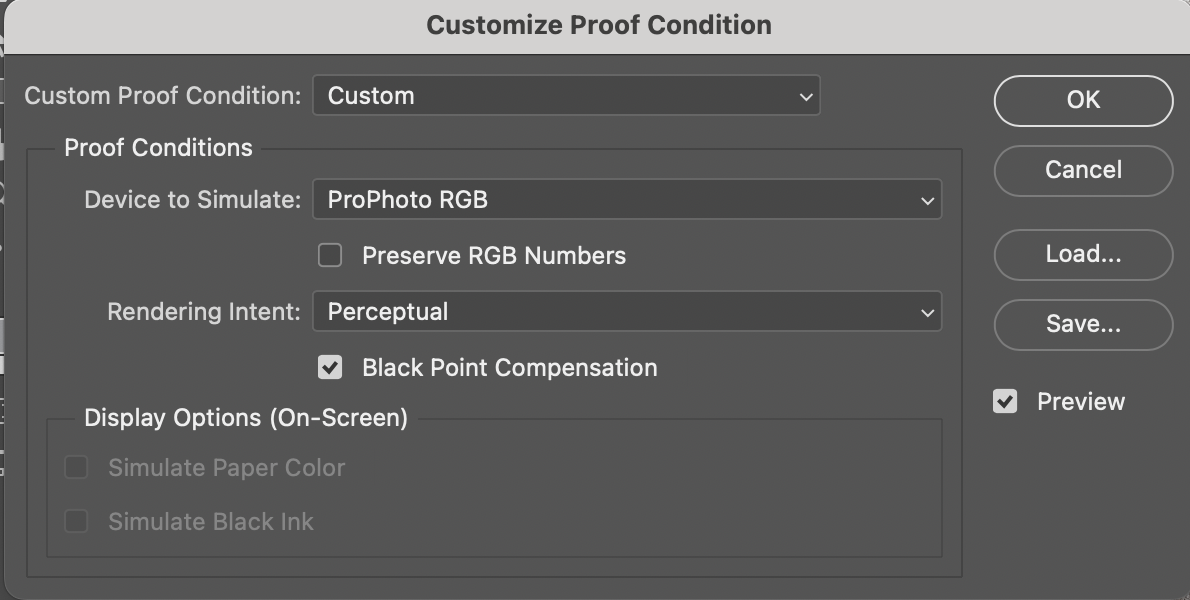
You have to set up Proof Setup
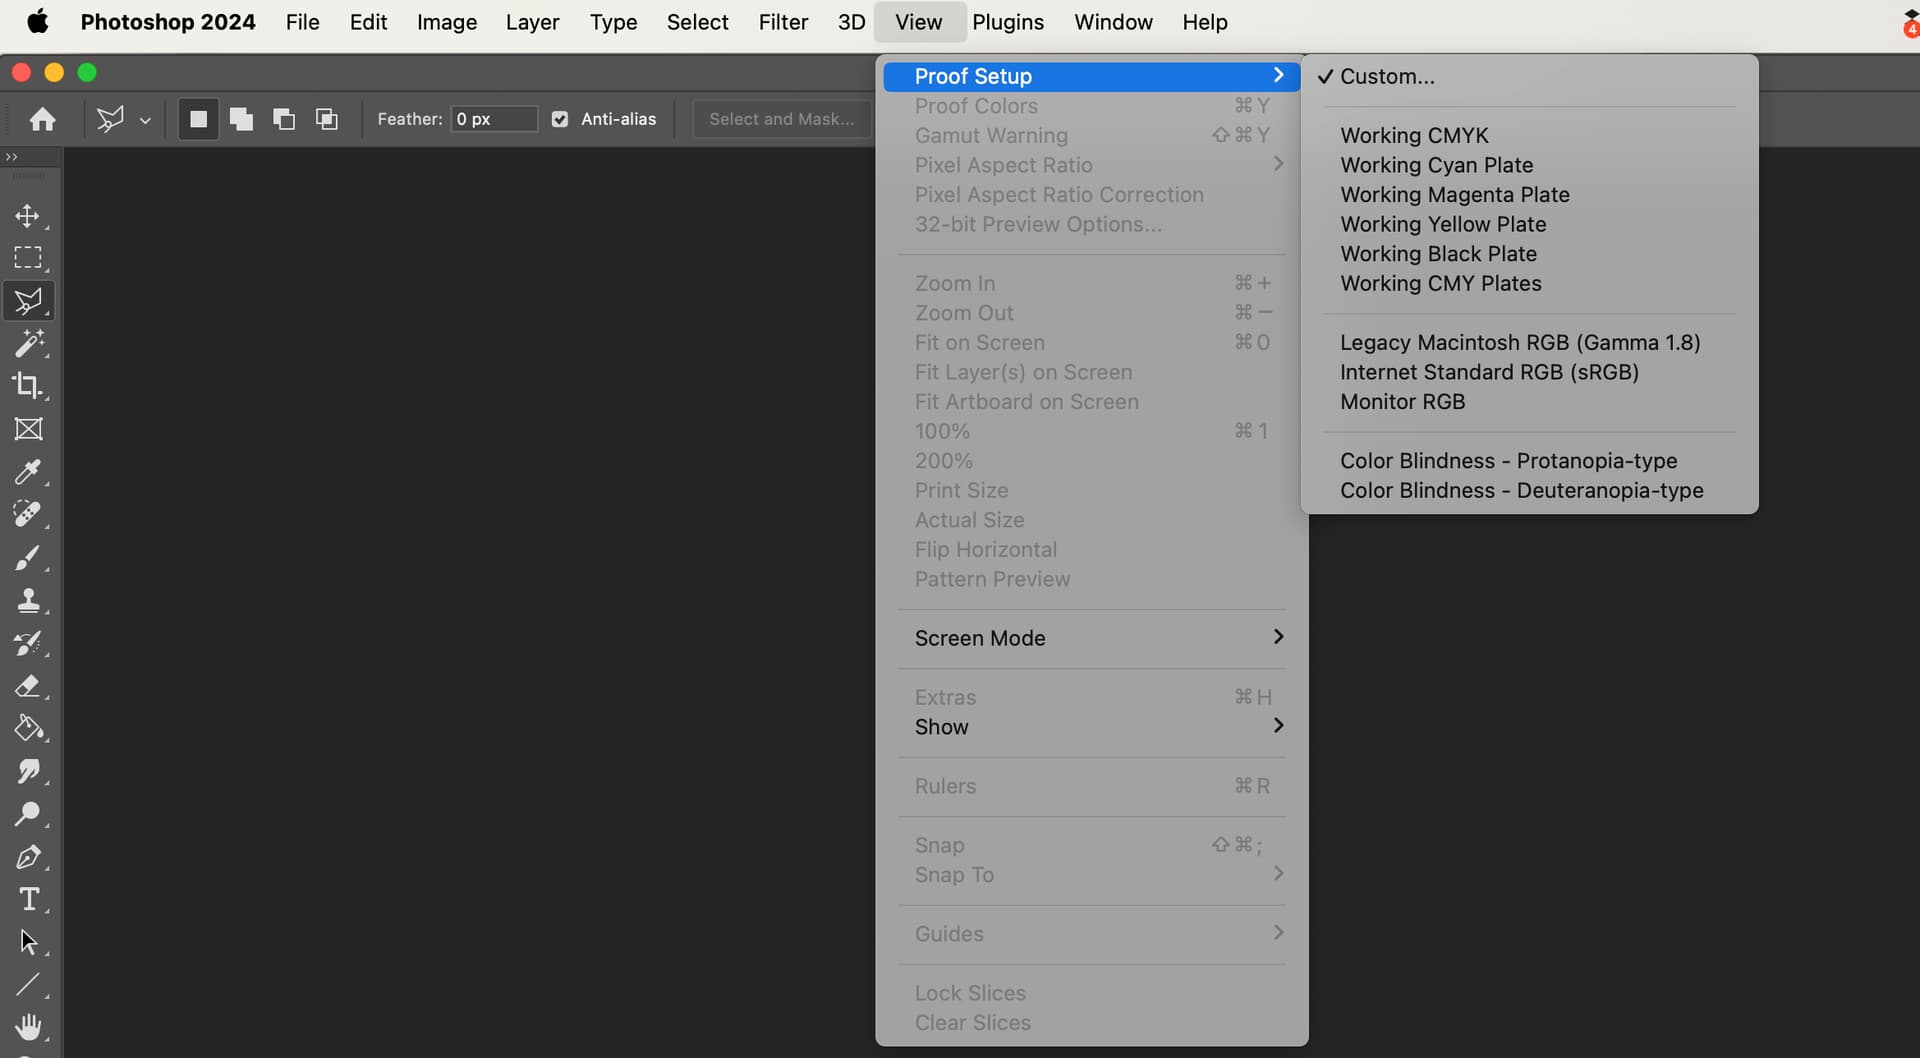
Custom
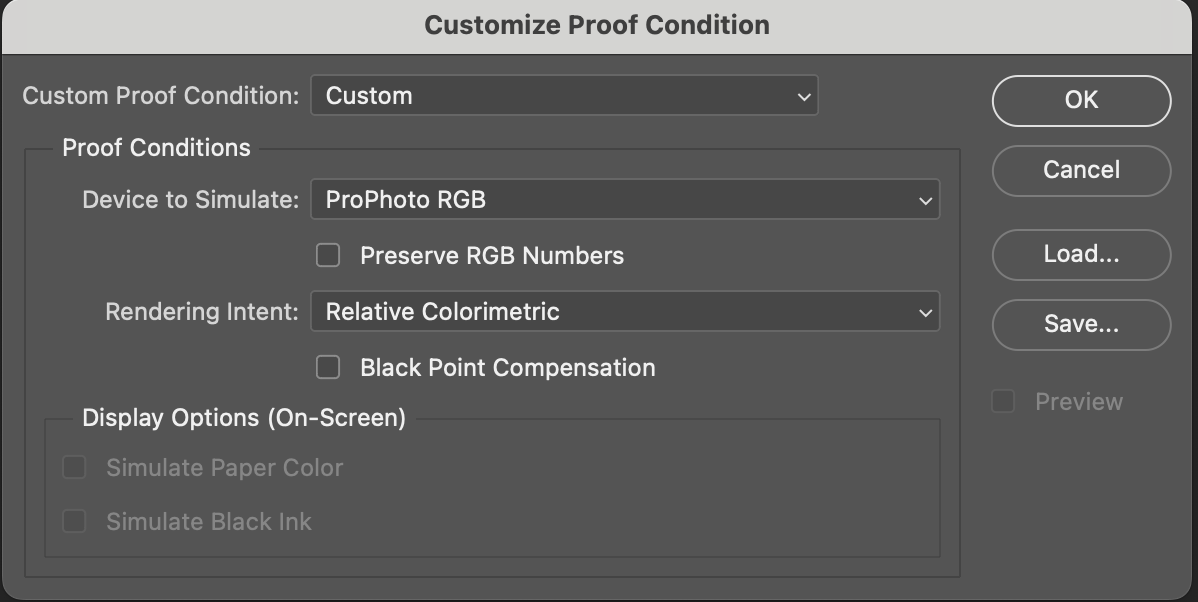
However given your Workingspace is ProPhoto, as you have shown, nothing can be outside that working space so any gamut check should show them in gamut.
Any colours would have been put into that working space with the rendering intent you have chosen.
The Proof Setup is intended to go from a working space to a smaller destination space. For example if your working space is ProPhoto and your are going to a printer with a smaller gamut that is when you would use the Proof Colors and Gamut Warning
Are you looking at the Triangle alongside the cyan in you screen grab?
Having just found this reply I will look further.
I think you should remember there are no real colours outside ProPhoto and your cyan (provided you did your measurements right) is a real colour so the warning triangle for the colour being outside ProPhoto seems like it isn’t OoG for ProPhoto.
I believe CTP and what I know about ProPhoto, I am sceptical of PS and not confident as the the real meaning of the triangle.
This was a rather hurried reply and I’m about to go to bed. I will delve further tomorrow, for fun.
Regards
Rex
It is the morning and looked up the meaning of the triangle.
An alert icon and mini swatch color beside the newly selected color (see Figure 1) will tell you that a color it is out of gamut. This means that the current selected color will be out of gamut if converted to the current CMYK space, as selected in the Photoshop Color Settings
1 Like
I put your colours into Worksheet and the Adobe RGB (1998) profile with Relative Colorimetric Intent and asked it to show ∆E2000 errors.
This is what I got

It shows a shift of ∆E 1.06 which is so close I would regard it as indistinguishable from the original colour.
Your other colours are definitely inside Adobe RGB and the ∆E values are almost zero.
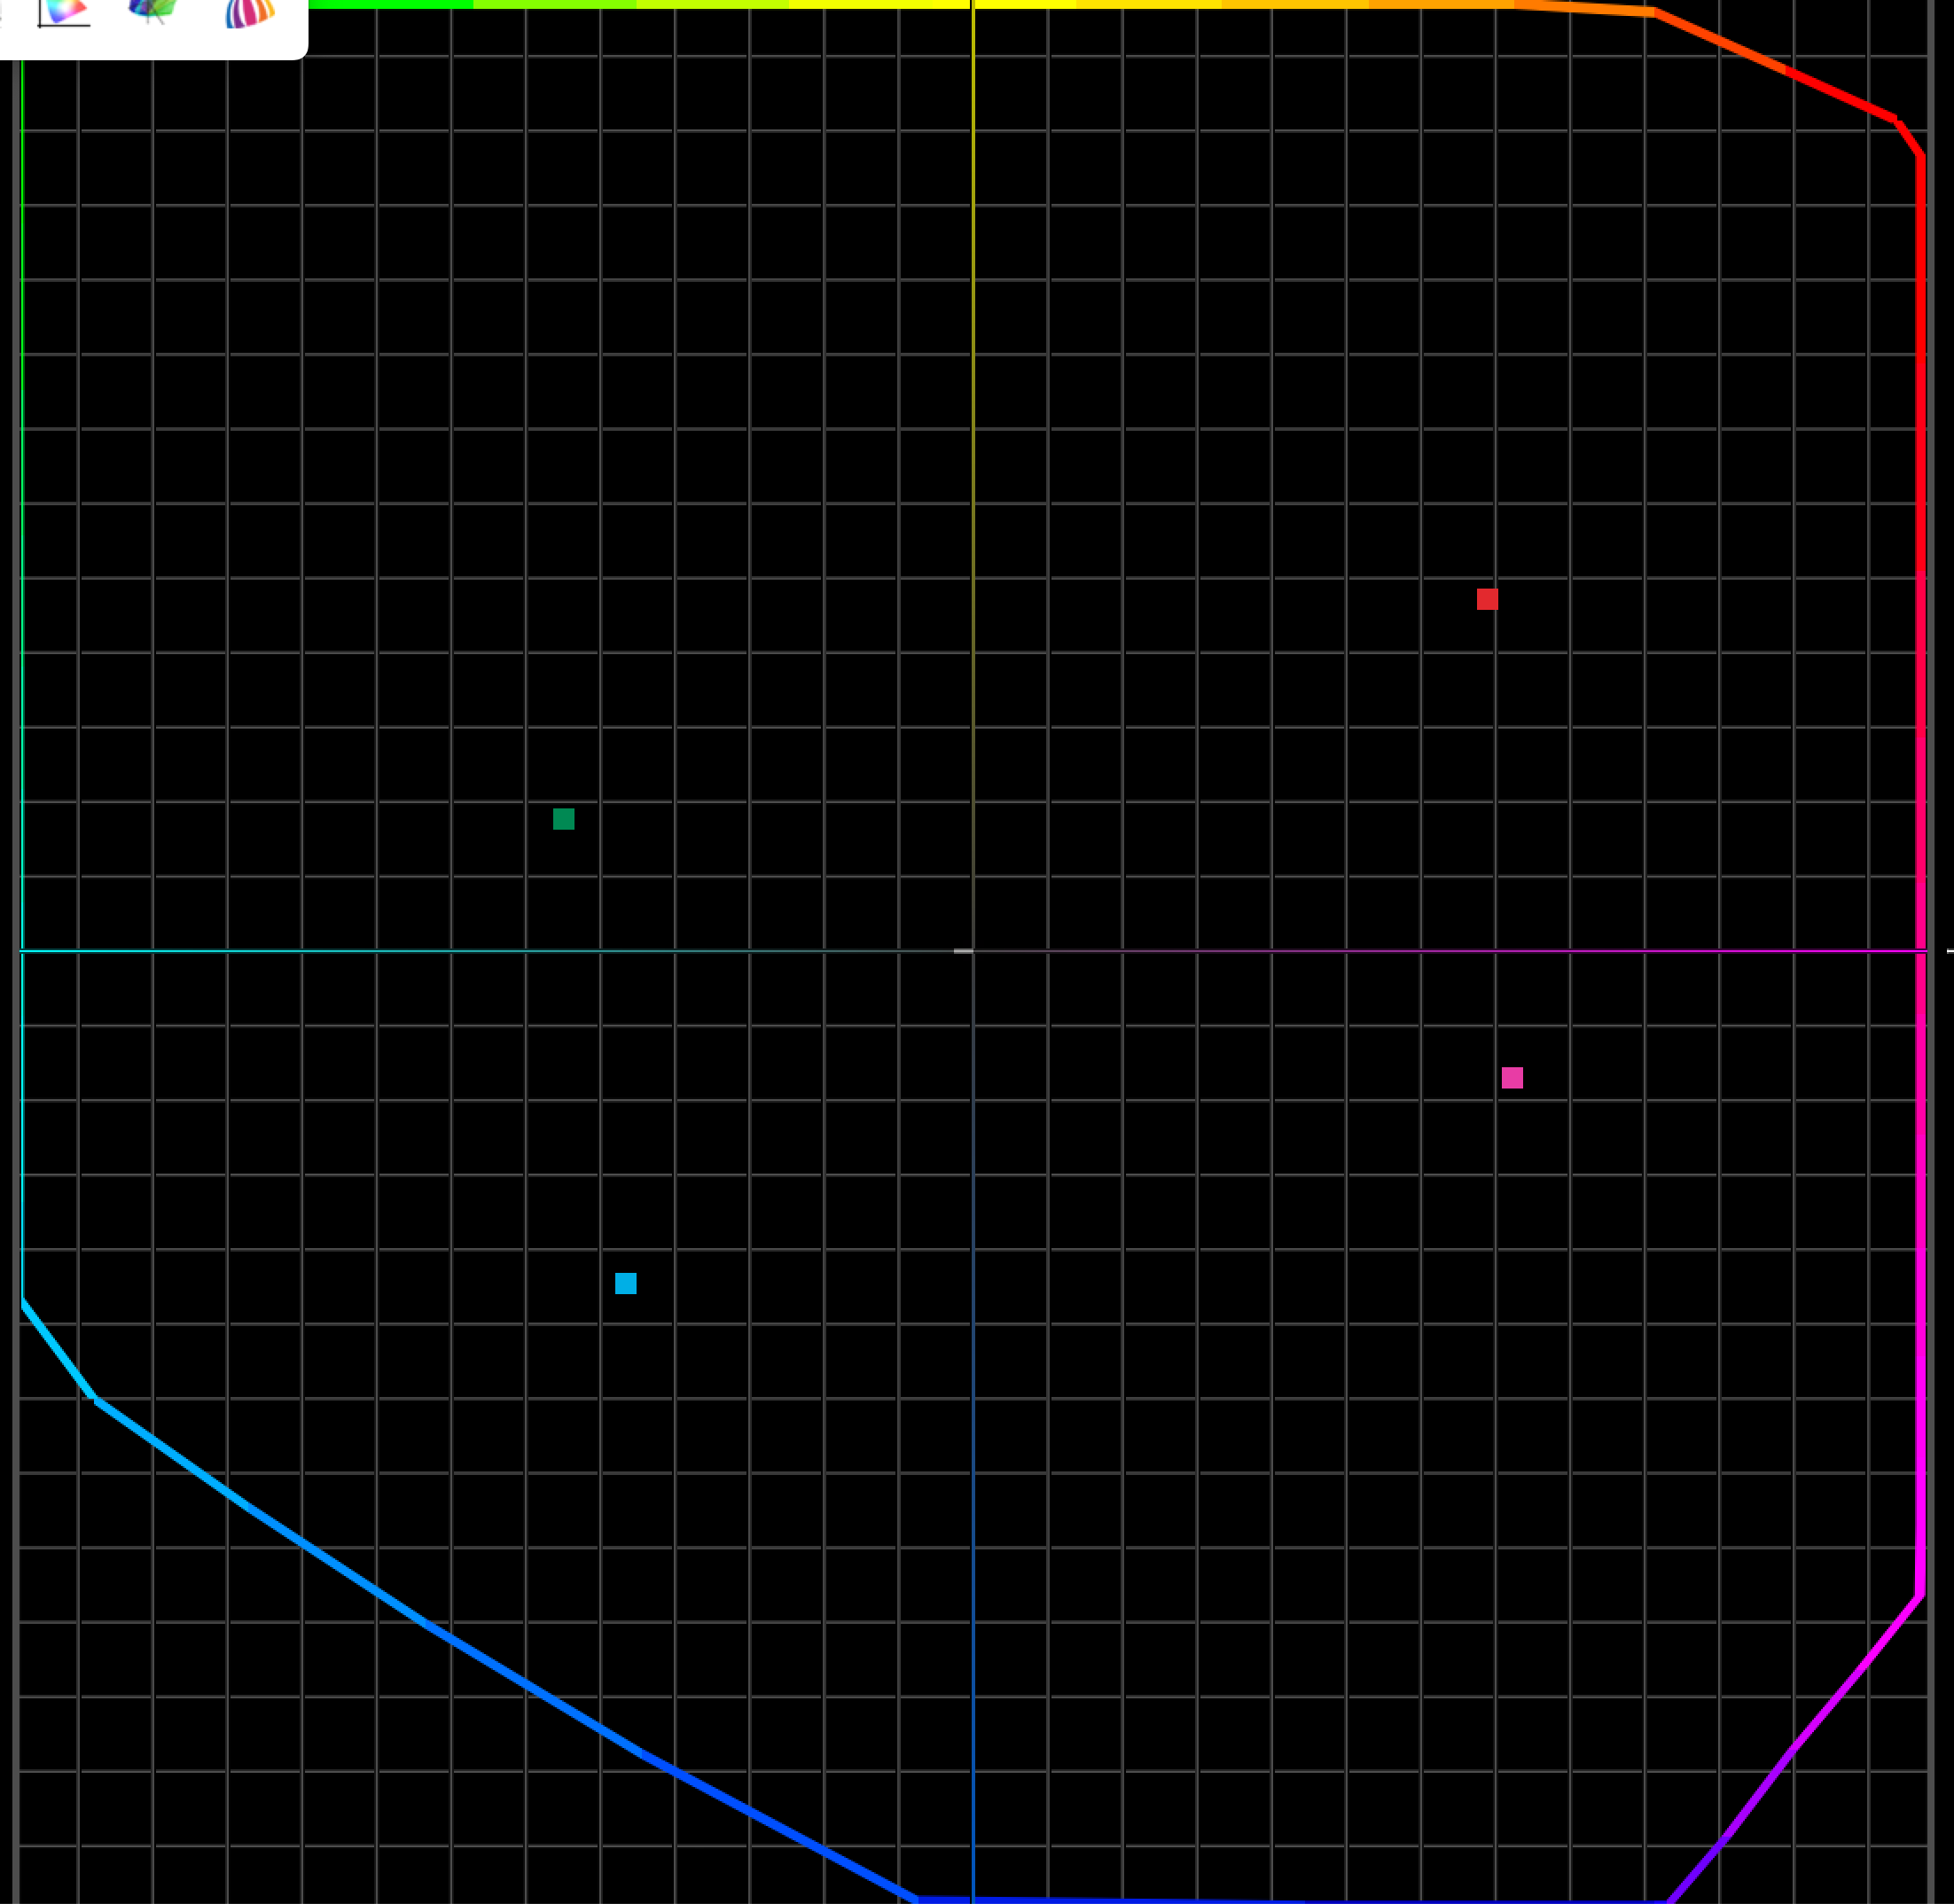
As a fun check I used 2D grapher and got this
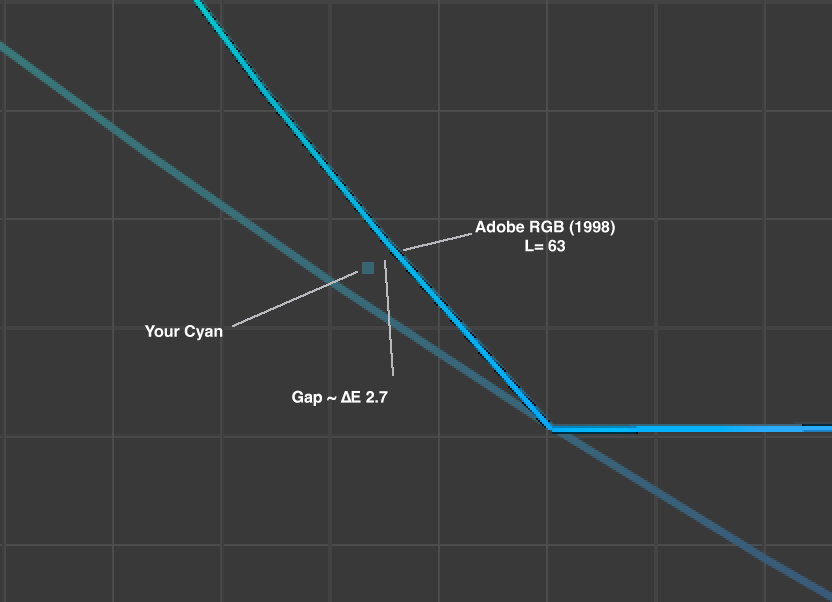
Which isn’t as accurate as worksheet but again is much less than the ∆E 6.7 you indicated.
My conclusion is that your four colours has three well within Adobe RGB and cyan is so close to gamut edge it can be considered in gamut.
I hope this helps you resolve your issue.
1 Like
Thanks for detail analysis and guidance.